The Beginner’s Guide to Integrating LightBurn into Your School’s Laser Curriculum
The integration of laser technology into high school curriculum through OMTech equipment and LightBurn software represents more than just teaching students how to use laser engraving machines—it's about empowering them to become creators, innovators, and problem-solvers.

For Students: These programs develop:
- Technical skills directly applicable to careers
- Design thinking and creative confidence
- Precision and attention to detail
- Project management and time management
- Collaboration and communication
- Entrepreneurial mindset
For Educators: You have the opportunity to:
- Transform traditional coursework into hands-on learning
- Connect theory to practice in tangible ways
- Inspire students who might struggle in conventional academics
- Prepare students for college and careers
- Build a legacy program that impacts hundreds of students
- Join a community of innovative educators
For Schools: Laser programs provide:
- Student engagement and retention
- College and career readiness
- Community partnerships and visibility
- Revenue generation possibilities
- Recognition and awards
- Preparation for future workforce needs

The modern Design & Technology (D&T) suite is undergoing a quiet revolution. Out goes the purely manual work, and in comes digital fabrication. At the heart of this shift is the laser cutter—specifically when paired with LightBurn software.
When teachers ask me, "We just got an OMTech laser; what software do we use?" the answer is almost always LightBurn. It has become the industry standard for educational CO₂ lasers, bridging the gap between a student's initial concept in CAD and the final physical creation.
This guide is designed for high school teachers and curriculum developers who are new to digital fabrication, providing a tutorial-style approach to integrating CAD/CAM principles using LightBurn and OMTech machinery.
Why LightBurn is the Ideal Beginner Laser Software for Schools
The traditional workflow for CNC machinery involved complex, expensive software, where CAD (design) and CAM (manufacturing) were separated. LightBurn changes this. It is an all-in-one hybrid.
Students can draw complex shapes directly in LightBurn (CAD), assign power and speed settings to those shapes (CAM), and control the laser machine itself—all from one interface. This streamlines the learning curve and reduces student frustration. Furthermore, its educational licensing makes it highly affordable for school labs, particularly compared to industrial engineering software.
From Concept to Creation: Integrating Design Thinking into the Curriculum
Digital fabrication in high schools shouldn't just be about making "cool stuff." It is a vehicle for teaching Design Thinking. A successful curriculum moves beyond "test cuts" toward student-driven problem-solving.
Consider a project like designing a unique, custom-engraved gift. The process is not linear. Students:
- Empathize: Who is this gift for? (A Mother's Day cutting board, a Christmas ornament).
- Define: What are the constraints? (Budget/material size, time available).
- Ideate: Sketch initial concepts on paper.
- Prototype (using LightBurn): Create the digital model, perhaps testing finger-joint tolerances on cheap cardboard first (Low-Fidelity Prototyping). This is crucial for budget-friendly prototyping and reducing material costs.
- Test/Create: Cut the final project, analyze the fit, and iterative.
When students make for a reason (like a highly engaging gift project for someone they care about), they take ownership. They naturally pay closer attention to sanding smoke stains, ensuring text is centered, and checking tolerances.

Step-by-Step: Setting Up a "Classroom" Project in LightBurn
For this tutorial, we will use a common project: a personalized handwritten recipe cutting board—a fantastic, sentimental gift that students take immense pride in.
Prerequisites for Your OMTech Setup
- LightBurn Education Setup: Ensure your license is activated on school computers.
- Device Setup: Connect your computer to your OMTech laser (via USB or Ethernet). In LightBurn, click 'Devices' > 'Find My Laser'. The software should automatically detect your machine.
The Workflow: Design to Cut
1. Conception and Design (CAD Phase)
A successful concept starts outside of LightBurn. For this project, students must source a physical handwritten recipe. This recipe is the data.
2. Bringing Data into LightBurn (The Tutorial)
A. Scan or Photograph the Recipe: Get a high-contrast scan or clear photograph of the handwriting.
B. Import: In LightBurn, go to File > Import and select your image (JPG/PNG).
C. Trace Image (The CAM Power Move): Students often make the mistake of trying to raster engrave a low-resolution photo, which looks poor. Instead, use the Trace Image tool. * Right-click the imported image and select Trace Image. * Adjust the 'Threshold' slider until only the black ink is captured. You should see a purple vector outline. * Click 'OK'. You now have vectors—mathematically defined lines that the laser can engrave with precision.
3. Assigning Power and Speed (The CAM Phase)
This is where students learn the difference between Cut and Engrave.
- Select the traced recipe. In the 'Cuts / Layers' window (usually on the right), assign it a color (e.g., Red).
- Double-click the Red layer. In the Layer Settings, change the 'Mode' to Fill.
- Settings: This depends on your OMTech’s wattage, but for engraving bamboo: Try Speed: 300 mm/sec, Max Power: 25%. Always encourage students to run a small test cut on a scrap piece first.
4. Project Setup (Digital Fabrication Curriculum)
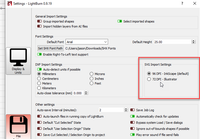
- Workspace: In Edit > Device Settings, input the correct working bed dimensions of your laser (e.g., 600mm x 400mm). This ensures students design within the physical limitations of the machine.
- Job Origin: Use 'User Origin' for most projects. Position your material in the laser bed and use the 'Frame' feature to ensure the laser beam will fire only onto the board.
5. Creating and Executing
- Ensure your fume extraction and water chiller are active.
- Final Inspection: Have students "dry run" or use the 'Framing' function one last time.
- Click Start.
LightBurn Interface: Teacher's Guide to Student Instruction
Understanding the Workspace
When students first open LightBurn, they'll see a clean, organized interface. As an educator, you should understand each area to effectively guide student learning.
Main Workspace (Center)
The large central area where designs appear. Key features:
- Grid background: Helps with alignment and sizing
- Rulers: Show measurements in current units (mm, inches)
- Red rectangle outline: Represents your laser's working area
- Origin point marker: Shows where (0,0) is located
Teaching Moment: Have students identify the working area limits and explain why staying within bounds matters (prevents crashes, ensures complete projects).
Toolbar (Left Side)
Contains drawing and editing tools. From top to bottom:
Selection Tool (S):
- Click to select objects
- Drag to move objects
- Handle corners to resize
- Student Exercise: Create shape, practice selecting and moving
Draw Line (L):
- Click-click-click to create connected lines
- Double-click or press Enter to finish
- Project Idea: Create geometric house design
Rectangle (R):
- Click and drag to create rectangle
- Hold Shift for square
- Practice Activity: Design business card template
Circle (C):
- Click and drag to create ellipse
- Hold Shift for perfect circle
- Exercise: Create Olympic rings design
Text Tool (T):
- Click to place text
- Type in text panel (right side)
- First Project: Name tag or bookmark with student name
Image Import (I):
- Brings in photos, logos, graphics
- Converts to engraveable format
- Advanced Project: Photo engraving on wood
Node Editing (N):
- Edit individual points on shapes
- Create custom curves
- Advanced Lesson: Modify shapes for custom designs
Boolean Operations:
- Combine shapes (weld, subtract, intersect)
- Key Lesson: Creating complex designs from simple shapes
Cuts/Layers Panel (Right Side)
This panel controls how the laser treats different colors/layers:
Layer Colors:
- Each color = different laser operation
- Black might engrave, red might cut
- Students assign operations to colors
Settings Per Layer:
- Speed: How fast laser moves
- Power: Laser intensity
- Passes: How many times to repeat
- Critical Teaching Point: Different materials need different settings
Preview Window (Bottom)
Shows exactly what laser will do:
- Displays toolpaths
- Shows order of operations
- Estimates time
- Always use before sending to laser!
Core Skills Progression for Students
Week 1-2: Basic Operation
Day 1-2: Interface Familiarization
- Open LightBurn
- Identify toolbar, workspace, panels
- Change view (zoom, pan)
- Save and open files
- Assessment: Students label interface screenshot
Day 3-4: Simple Shapes
- Create rectangles, circles, lines
- Resize and move objects
- Align objects using alignment tools
- Change colors (assign to layers)
- Project: Create geometric coaster design
Day 5: Text Addition
- Use text tool
- Choose fonts
- Size and position text
- Weld text to shapes
- Project: Personalized bookmark
Week 2: First Laser Projects
- Load material library settings
- Preview projects
- Send to laser
- Monitor operation
- Remove and finish pieces
- Project: Cut and take home bookmark
Week 3-4: Intermediate Techniques
Importing Images:
- Find appropriate images (copyright discussion!)
- Import into LightBurn
- Adjust image for engraving (contrast, brightness)
- Set engrave parameters
- Project: Photo gift tag
Boolean Operations:
- Weld shapes together
- Subtract shapes (creating cutouts)
- Intersect shapes
- Project: Layered badge or pendant
Precision Measurement:
- Set exact dimensions
- Use rulers and guides
- Align multiple objects
- Create consistent spacing
- Project: Precise-fit puzzle pieces
Week 5-6: Advanced Design
Node Editing:
- Understand Bezier curves
- Edit paths and shapes
- Create custom designs
- Smooth and optimize paths
- Project: Original logo or monogram
Layered Projects:
- Multiple material colors
- Assembly designs
- Tolerance planning
- Project: Multi-layer box or sign
Optimizing for Production:
- Nesting parts efficiently
- Minimizing waste
- Batch production techniques
- Project: Create set of matching items
Curriculum Integration: Practical Lesson Plans
Unit 1: Introduction to Digital Fabrication (2 Weeks)
Target Course: Introduction to Engineering, Tech Ed, STEM
Learning Objectives: Students will:
- Understand the principles of laser cutting and engraving
- Identify appropriate materials and safety protocols
- Create a simple design in LightBurn
- Produce a finished product using the OMTech laser
Day 1-2: Theory and Safety
Materials:
- LightBurn software (demonstration mode)
- OMTech laser (for demonstration)
- Safety handouts
- Material samples (safe and unsafe)
Activities:
Hour 1: Understanding Laser Technology
- How CO₂ lasers work (light amplification, beam focusing)
- Difference between cutting and engraving
- Materials science: what cuts well, what doesn't
- Interactive: Pass around material samples, predict behavior
Hour 2: Safety Training
- Personal protective equipment (safety glasses when required)
- Fire safety and prevention
- Proper ventilation
- Emergency procedures
- Material hazards (never cut PVC, ABS, polycarbonate)
- Activity: Safety scenario discussions
- Assessment: Written safety quiz (must pass to operate laser)
Day 3-4: LightBurn Basics
Computer Lab Session:
Hour 1: Interface Introduction
- Teacher demonstrates LightBurn on projector
- Students follow along on their computers
- Create account/save location for files
- Practice: Navigate interface, create simple shapes
Hour 2: First Design Project
- Design a name bookmark (2" × 6")
- Include name, simple border, small graphic
- Choose appropriate fonts
- Set up for engraving (no cutting yet)
- Save file with naming convention: "LastName_FirstName_Bookmark.lbrn2"
Homework Assignment: Sketch three ideas for next project on paper. Consider what could be cut from a 4" × 4" piece of wood.
Day 5-6: First Laser Projects
Supervised Production Day:
Setup:
- Divide class into groups of 4-5
- Each group gets 30-minute laser session
- Others work on next project design
Procedure per Group:
- Review safety checklist
- Load material (teacher demonstrates, student assists)
- Focus laser (teacher supervises)
- Load student files one by one
- Each student previews their project
- Send to laser and monitor
- Remove finished piece
- Next student repeats
Teacher Role:
- Supervise all laser operations
- Check each preview before sending
- Monitor for safety issues
- Help with material removal
- Ensure cleanup between groups
Day 7-8: Project Refinement and Iteration
Reflection Activity:
- Examine finished bookmarks
- Identify successes and issues
- Discuss how to improve
- Introduce concept of iteration
Next Project Design:
- Create coaster design (3.5" × 3.5")
- Must include cut outline and engraved details
- Introduce cutting parameters
- Discuss material thickness considerations
Day 9-10: Production and Assessment
Production:
- Repeat group rotation with coasters
- Students now more confident with process
- Increase student responsibility for setup
Assessment:
- Finished products (rubric-based)
- Design file quality
- Process documentation
- Safety protocol adherence
- Peer and self-evaluation
Unit Assessment Rubric:
Design Quality (25 points):
- Originality and creativity
- Technical execution in LightBurn
- Appropriate size and proportions
- File organization and naming
Technical Skill (25 points):
- Successful use of LightBurn tools
- Proper layer/color assignment
- Correct parameter selection
- Optimization for production
Safety & Professionalism (25 points):
- Consistent safety protocol adherence
- Respectful equipment use
- Clean workspace
- Follows supervision requirements
Final Product (25 points):
- Clean cuts/engraves
- Proper material choice
- Finished/polished
- Meets project specifications
Unit 2: Design Thinking and Problem-Solving (3 Weeks)
Target Course: Engineering Design, Product Design, Advanced Tech Ed
Learning Objectives: Students will:
- Apply design thinking process to real problems
- Create functional products using laser cutting
- Iterate designs based on testing
- Document design process professionally
Project: Design a Phone Stand
Week 1: Research and Ideation
Day 1: Problem Definition
- What makes a good phone stand?
- User needs analysis
- Constraint identification
- Activity: Interview partners about phone stand preferences
Day 2-3: Research Existing Solutions
- Analyze commercial phone stands
- Identify design patterns
- Discuss materials and construction
- Measure phone dimensions
- Homework: Sketch 5 different phone stand concepts
Day 4-5: Digital Design Development
- Translate sketches to LightBurn
- Learn about joints and assembly
- Calculate angles for stability
- Create first digital prototype
- Goal: Complete technical drawing
Week 2: Prototyping and Testing
Day 1: First Prototype Production
- Create prototype in cardboard (fast, cheap material for testing)
- Cut with lower power settings
- Assemble and test
- Documentation: Photo and note issues
Day 2: Analysis and Redesign
- What worked? What failed?
- Measure actual angles and dimensions
- Identify improvements needed
- Revise digital design
- Activity: Create comparison chart (v1 vs. v2 changes)
Day 3-4: Second Prototype
- Cut second version in wood
- Test with actual phones
- Have peers test design
- Gather feedback
- Assessment: Is it functional? Stable? Attractive?
Day 5: Final Revisions
- Incorporate all feedback
- Refine dimensions
- Add aesthetic details (optional engraving)
- Optimize for material use
- Prepare final version
Week 3: Final Production and Presentation
Day 1-2: Final Production
- Cut final versions
- Sand and finish
- Photograph for portfolio
- Quality control check
Day 3-4: Documentation
- Create design portfolio showing process
- Write reflection on design decisions
- Include photos of all iterations
- Explain what changed and why
Day 5: Presentations
- 3-minute presentation per student
- Demonstrate phone stand
- Explain design process
- Discuss what was learned
- Peer questions
Assessment Components:
Process Documentation (30%):
- Sketches and ideation
- Iteration documentation
- Testing results
- Reflection quality
Technical Execution (30%):
- LightBurn file quality
- Appropriate use of techniques
- Precision and fit
- Material efficiency
Final Product (25%):
- Functionality
- Stability
- Aesthetic quality
- Finish and craftsmanship
Presentation (15%):
- Clear explanation of process
- Discussion of challenges
- Professional delivery
- Response to questions
Unit 3: Cross-Curricular Integration Examples
History/Social Studies: Historical Artifact Reproduction
Project: Create museum-quality reproductions of historical artifacts
Example: Ancient Seal Reproduction
- Research historical seals from various cultures
- Design in LightBurn
- Engrave into wood or acrylic
- Test with clay or wax
- Create museum-style display card with historical context
Learning Outcomes:
- Historical research skills
- Understanding of material culture
- Connection between past and present technology
- Appreciation for craftsmanship
Science: Lab Equipment Design
Project: Design and produce custom lab equipment
Example: Beaker Holder Rack
- Identify needs in science classroom
- Measure glassware precisely
- Design custom organizer
- Calculate material strength
- Produce functional solution
Learning Outcomes:
- Application of physics (stability, weight distribution)
- Measurement precision
- Problem-solving
- Understanding materials science
Mathematics: Geometric Exploration
Project: Create geometric manipulatives and teaching tools
Example: Tessellation Puzzle
- Explore mathematical principles of tessellation
- Design interlocking pieces
- Calculate tolerances for fit
- Create sets for elementary students
Learning Outcomes:
- Geometric principles
- Spatial reasoning
- Precision measurement
- Mathematical communication
Art: Portfolio Development
Project: Create original artwork using laser techniques
Example: Multi-Layer Relief Art
- Design composition with depth
- Create layers in different materials/colors
- Assemble layered artwork
- Frame and present
Learning Outcomes:
- Design principles (composition, color, depth)
- Technical art skills
- Portfolio piece for college applications
- Understanding of contemporary art fabrication
Unit 4: Entrepreneurship and Production (4 Weeks)
Target Course: Business, Entrepreneurship, Advanced Tech Ed
Learning Objectives: Students will:
- Develop a product suitable for small-scale production
- Calculate costs and pricing
- Create production workflow
- Market and sell products
- Analyze business results
Week 1: Product Development
Day 1-2: Market Research
- Identify potential products (school spirit items, gifts, organizational tools)
- Survey potential customers
- Analyze competition
- Determine viable product ideas
- Activity: Create market research report
Day 3-5: Product Design and Prototype
- Design chosen product in LightBurn
- Calculate material costs
- Estimate production time
- Create prototype
- Test with focus group
- Refine based on feedback
Week 2: Business Planning
Day 1-2: Cost Analysis
- Material costs per unit
- Time per unit (at $15/hour)
- Equipment costs (amortized)
- Overhead allocation
- Total cost per unit
Example Calculation:
School Spirit Keychain:
- Materials (wood blank, keychain hardware): $0.75
- Labor (5 minutes × $15/hour): $1.25
- Equipment cost (amortized): $0.25
- Total Cost: $2.25
- Markup 3×: $6.75
- Retail Price: $6.99
Day 3-4: Production Planning
- Nesting parts for material efficiency
- Batch production techniques
- Quality control processes
- Packaging design
- Activity: Create production guide document
Day 5: Marketing Strategy
- Target audience identification
- Pricing strategy
- Sales channels (school store, website, events)
- Promotional materials design
- Social media strategy
Week 3: Production
Full Week: Manufacturing
- Produce inventory (20-50 units depending on product)
- Implement quality control
- Package products
- Create point-of-sale materials
- Track production time and issues
- Documentation: Production log with times and costs
Week 4: Sales and Analysis
Day 1-3: Sales Period
- Set up sales location
- Implement marketing plan
- Track sales data
- Customer feedback collection
Day 4-5: Business Analysis
- Calculate actual costs vs. projected
- Analyze sales data
- Calculate profit/loss
- Identify lessons learned
- Present results to class
- Final Deliverable: Business analysis report
Assessment:
Business Plan (25%):
- Market research quality
- Cost calculations accuracy
- Marketing strategy
- Professional presentation
Product Quality (25%):
- Design excellence
- Production consistency
- Quality control evidence
- Customer satisfaction
Production Execution (25%):
- Efficiency of workflow
- Material optimization
- Time management
- Problem-solving
Business Results (25%):
- Sales achievement
- Profitability
- Analysis depth
- Lessons learned documentation
Advanced LightBurn Techniques for Upper-Level Students
Parametric Design with LightBurn
Concept: Creating designs with adjustable variables
Application: Customizable Gift Box
Rather than designing a fixed-size box, students create a template where dimensions can be easily changed:
Technique:
- Design base box structure
- Use variables for key dimensions (width, height, depth)
- Create formulas for dependent measurements (tabs, joints)
- Save as template for future customization
Educational Value:
- Mathematical thinking
- Programming logic
- Efficient design practice
- Real-world application
Integration with CAD Software
Workflow: Fusion 360 → LightBurn
Many schools have Autodesk Fusion 360 (free for education). Advanced students can:
Process:
- Design complex 3D object in Fusion 360
- Create 2D cutting patterns
- Export as DXF or SVG
- Import to LightBurn
- Add engraving details
- Produce with laser
Example Project: Gear-Driven Mechanical Model
- Design in Fusion 360 (3D modeling)
- Create flat pattern for laser cutting
- Cut components
- Assemble working mechanism
Skills Developed:
- 3D-to-2D translation
- Mechanical design
- File format management
- Multi-software workflow
Photo Engraving Mastery
Advanced Image Preparation:
Basic photo engraving produces mediocre results. Advanced students learn:
Pre-Processing Techniques:
- Adjust contrast in photo editor (GIMP, Photoshop)
- Convert to high-contrast black/white
- Enhance important features
- Remove distracting elements
- Optimize resolution (300-600 DPI)
LightBurn Image Settings:
- Dithering methods (Jarvis, Stucki, Floyd-Steinberg)
- DPI settings
- Negative vs. positive images
- Gamma adjustments
- Overscanning
Materials Testing: Different materials engrave photos differently:
- Basswood: Soft tones, subtle gradients
- Maple: High contrast, sharper details
- Acrylic: Frosted white appearance
- Anodized aluminum: Permanent, precise
Project: Memorial Portrait Students create high-quality photo engravings of historical figures, family members, or pets, applying professional-grade techniques.
Jig and Fixture Design
Problem: Engraving on irregular objects (e.g., wooden spoons, pens, bottles)
Solution: Design custom jigs to hold items in place
Process:
- Measure object precisely
- Design jig in LightBurn
- Cut jig from plywood
- Test fit
- Use jig for consistent positioning
- Batch-produce engraved items
Educational Value:
- Problem-solving
- Precision measurement
- Manufacturing thinking
- Fixturing principles (applicable to CNC, 3D printing)
Classroom Management and Safety Systems
Laser Operator Certification System
Level 1: Observation Only
- Has attended safety training
- Passed written safety quiz
- May observe operations
- May design projects but not operate laser
- Documentation: Safety quiz score on file
Level 2: Supervised Operator
- Completed Level 1
- Demonstrated competency through projects
- May operate laser with teacher present
- Responsible for safety checklist completion
- Documentation: Teacher sign-off form
Level 3: Independent Operator (Upper-class students only)
- Completed Level 2 for at least one semester
- Perfect safety record
- Demonstrated maturity and responsibility
- May operate with teacher in building (not necessarily in room)
- May assist in training Level 1 students
- Documentation: Advanced operator certification
Benefits of This System:
- Clear progression path motivates students
- Distributes teaching burden (Level 3s help others)
- Incentivizes responsibility
- Creates student leaders
- Maintains safety standards
Scheduling and Sign-Up Systems
Challenge: Multiple students/classes want laser access
Solution: Digital Scheduling System
Tools:
- Google Calendar (shared with laser time blocks)
- SignUpGenius (for session scheduling)
- School learning management system
Implementation:
- Create visible schedule (digital and posted)
- Students sign up for 30-minute blocks
- Include required information:
- Student name
- Project description
- Materials needed
- File ready? (yes/no)
- Teacher reviews and approves
- Student arrives with file ready
- Efficient use of laser time
Priority System:
- Required class projects: First priority
- Elective course projects: Second priority
- Personal projects: Third priority
- Staff projects: As available
Material Inventory and Management
Problem: Material waste, unknown inventory, budget overruns
Solution: Structured Material Management System
Material Storage:
- Organized by type (wood, acrylic, leather, etc.)
- Labeled by thickness
- Scrap bin for small pieces
- Donation bin for student-provided materials
Checkout System:
- Student requests material
- Teacher/aide measures and notes dimensions
- Records in log (student name, material, size, date)
- End of semester: Calculate material cost per student
- Consider material fees or fundraising if needed
Scrap Management: Small pieces are valuable:
- Organize by size
- Perfect for testing settings
- Use for small projects (keychains, ornaments, gift tags)
- Students may "shop" scrap bin at no cost
Maintenance Schedule for Teachers
Daily (5 minutes):
- Visual inspection of laser
- Check water level (if using bucket system)
- Wipe down exterior
- Empty scrap bin
Weekly (15 minutes):
- Clean honeycomb bed
- Check lens for dirt/damage (clean if needed)
- Test alignment with simple cut
- Review maintenance log
Monthly (30 minutes):
- Deep clean mirrors and lens
- Clean rails and motion systems
- Check belt tension
- Lubricate if needed (per OMTech manual)
- Test emergency stop
- Check extraction system
Quarterly (1 hour):
- Comprehensive inspection
- Check tube alignment
- Test all safety interlocks
- Review safety protocols with students
- Update material library if needed
- Backup all student project files
Summer Break:
- Full cleaning and maintenance
- Replace consumables if needed
- Plan for next year's curriculum
- Organize material inventory
Maintenance Log: Keep binder or digital log:
- Date of service
- What was done
- Any issues noticed
- Parts replaced
- Next service due date
Digital Fabrication Beyond the Classroom
By integrating LightBurn and OMTech lasers into your curriculum, you aren't just teaching software; you are teaching the fundamentals of modern engineering workflows (CAD/CAM). This structured approach—from Trace Image to Fill settings—moves students away from passive consumption of technology toward confident digital creation.