








Complete Guide To Laser Engraving Acrylic (Cast vs Extruded Acrylic)
Acrylic (Plexiglass) is one of the most rewarding materials you can engrave with a laser engraving machine. It is affordable, easy to source, available in countless colors and finishes, and capable of producing crisp engravings with a distinctive frosted appearance that few other materials can match.
Whether you're creating custom signs, LED edge-lit displays, business products, personalized gifts, or detailed photo engravings, acrylic offers an excellent balance of durability, appearance, and ease of use.
However, getting professional results depends on making the right choices from the beginning. The type of acrylic you buy, the laser engraver you use, your engraving settings, and even your cleaning method can dramatically affect the outcome.
The mistake many beginners make is to purchase the wrong acrylic or use incorrect settings, only to end up with melted edges, poor contrast, or cloudy engravings.

What are the best types of Acrylic For Laser Engraving?
There are two main categories of acrylic for laser engraving: cast acrylic and extruded acrylic. The wide consensus in the laser engraving world is that cast acrylic is the superior choice for laser engraving, and extruded acrylic is generally not ideal, except for strictly laser-cutting projects.
- Cast acrylic is preferred because it is harder, creates a beautiful frosted finish, and is more suitable for different kinds of laser engraving applications.
- Extruded acrylic, by comparison, is soft, and even though it is more affordable, it generally does not have the hardness required for laser engraving materials.
Cast vs. Extruded Acrylic For Laser Engraving: Differences at a Glance
| Property | Cast Acrylic (GS) | Extruded Acrylic (XT) |
| Engraving Result | Turns a bright, frosted white with excellent contrast. | Engraves clear, dull grey, or "wet" looking; prone to melting. |
| Laser Cutting | Cuts cleanly, but requires slightly more power; minimal edge burrs. | Cuts very quickly and leaves a glossy, glass-like edge. |
| Masking | Usually comes with paper masking (preferred by laser users). | Usually comes with plastic film masking (melts and catches fire easily). |
| Thickness | Slight variations across the sheet. | Highly uniform thickness. |
How To Differentiate Between Cast and Extruded Acrylic
- If the sheet doesn't specify whether it is cast acrylic or extruded acrylic, check the masking. Paper liners usually mean cast, while blue or clear plastic film usually indicates extruded.
- Alternatively, you can look at the bare edge: cast acrylic has a clear or white edge, while extruded often carries a very slight bluish or grey tint.
- You can also use the "Burn Test": If you burn a tiny scrap piece and can't tell whether it is cast or extruded, burn it briefly. Extruded acrylic will burn quietly and drip flaming droplets. Cast acrylic will crackle and pop but will not drip.
4 Most Common Types of Acrylic for Laser Engraving
- Clear cast acrylic: The absolute standard for awards, plaques, and LED edge-lit nightlights. When engraved from the back (mirrored), it produces a beautiful 3D frosted look. OMTech’s 10 Pack Clear Acrylic Sheets measure 12x8 inches and are perfect for engraving and cutting bigger projects
- Two-tone / engraving plastics: Often manufactured by brands like Rowmark, these sheets have a thin top color layer and a contrasting core layer (e.g., black top layer over a white core). Engraving away the top layer reveals the crisp color underneath without needing paint-filling.
- Opaque and translucent colored acrylic: Cast colored sheets are popular for signage and keychains. Personally, I find that dark colors (like black or deep blue) contrast beautifully when surface-engraved. Check out OMTech 10-Pack Black Acrylic Sheets for Laser Engraving and Cutting
- Mirror acrylic: Note that mirror acrylic is almost exclusively extruded. To engrave it safely without destroying the front, you must flip it over and laser-etch away the grey backing layer on the reverse side.

2 Important Tips for Choosing Acrylic For Laser Engraving
- Ensure it is compatible with laser engraving machines: Never substitute acrylic with polycarbonate (Lexan). Polycarbonate does not cut cleanly, creates highly toxic fumes, turns a charred brown color, and can ruin your laser optics.
- Choose a reliable supplier: For high-quality cast acrylic, I, like most people, avoid big-box hardware stores because they mostly sell extruded sheets meant for windows. Instead, buy from dedicated acrylic suppliers like TAP Plastics, Houston Acrylic, Curbell, or Rowmark.
What Types of Laser Engravers Are Best For Engraving Acrylic?
1. CO2 Laser Engravers: Best For Acrylic
CO₂ laser engraving machines are overwhelmingly the absolute best machines for acrylic, and the fundamental reason comes down to physics. Acrylic completely absorbs the infrared wavelength of a CO₂ laser engraver, which then allows it to engrave and cut any color (including clear acrylic) flawlessly.
So, the reason CO2 laser engravers are best for cutting acrylic is that they have the physical properties required to cut and engrave all the different types and colors of acrylic.
2. Diode Laser Engraver (Works, But Limited)
Blue diode laser engraving machines can also be used for engraving acrylic, but engraving acrylic with a diode laser engraver can be very frustrating. That is because blue diode lasers ( the type of laser found in most entry-level desktop diode laser engravers) shoot a visible light wavelength that passes straight through clear, white, and blue acrylic like a window.
So, with a diode laser, you are very likely to struggle with certain colors of acrylic: a problem you would not have with CO2 laser engravers.
If your primary goal is working with acrylic, it is wiser and more effective to save up for a CO₂ laser engraver machine. They cut and engrave every single color of acrylic with beautiful, frosted results.
What are the Best Laser Engravers for Acrylic?
1. Best Budget/Tinkerer Laser Engravers For Acrylic: OmTech 40W–55W ("K40" style) machines.
Users love the OMTech “ K40desktop” laser engravers mainly for their affordability and the value they provide at a low price.
The OMTech K40+ 45W Desktop CO2 Laser features an 8" x 12" working area and comes with a detachable honeycomb workbed. It is an upgrade from the classic 40W design with its powerful 45W laser, giving you the performance at a price that beats competing models. Currently at $600, it is the best machine for stepping into the world of acrylic laser cutting and engraving without breaking the bank.
2. Best Mid-Range Desktop Laser Engravers For Acrylic: OMTech Polar Lite 55W and the Monport Reno45 Pro 45W
The top picks are the OMTech Polar Lite 55W and the Monport Reno45 Pro 45W. Both are user-friendly, enclosed desktop units that work straight out of the box and seamlessly integrate with LightBurn software.
The OMTech Polar Lite features a 20.1" × 11.8" workspace, engraves at a top speed of 500 mm/s, and features an Auto Focus function. It is designed to provide the space, speed, and precision needed for small businesses handling larger or bulk acrylic projects at an affordable cost. Currently available at $199, and comes with a 1-year warranty and other purchasing perks.
3. Best Premium Prosumer Engraver For Acrylic: OMTech 60W CO2 Laser Engraver.
The OMTech Pronto 35 60W CO2 Laser Engraver and Cutter is one of the best commercial-grade laser engravers for acrylic. It is fully enclosed with Class 1 level safety, has a massive 20" x 28" working area, and engraves at a top speed of 1,000 mm/s, which is about 37% faster than other competitors.
It is also packed with all the automatic features you need and an upgraded transmission system (with a red dot) for dealing with some of the more complex acrylic projects that demand more precision and consistency.
With the Pronto 35, you can speed up your acrylic engraving and handle large-quantity acrylic production for your business without losing efficiency and accuracy.

How To Laser Engrave Clear Acrylic (2 Methods)
The first and most important thing to know about engraving clear acrylic is that the process will differ depending on whether you are using a CO₂ laser or a Diode laser. Clear acrylic is see-through, so the laser wavelength dictates whether the machine can "see" the material or if you need to use certain hacks to force it to work.
Method 1: Using a CO₂ Laser (The Easy Way)
CO₂ lasers are easy to use for engraving acrylic because clear acrylic naturally absorbs their infrared light beam. You do not need any special paints or coatings. Here’s the full process of how to use a CO2 laser engraver for clear acrylic:
- Keep the paper masking on: Leave the protective paper masking on the top side of the acrylic sheet. This prevents stray smoke from staining the clean plastic around your design.
- Focus the beam: Focus your laser lens directly on the top surface of the acrylic sheet.
- Use high speed and low power: Acrylic engraves very easily. If your power is too high or your speed is too slow, the plastic will melt into a blob instead of frosting. You want just enough heat to cleanly fracture the surface.
- Mirror your design (crucial tip): A trick I have seen online is flipping (mirroring) your design in your software (like LightBurn) and engraving it on the back side of the acrylic. When you flip the piece over to look at it from the front, the engraving looks incredibly smooth, glossy, and professional.
- Peel and clean: Peel off the remaining paper masking. Use a soft microfiber cloth and a little bit of water or mild dish soap to wipe away any white dust. Never use rubbing alcohol (isopropyl alcohol) on laser-cut acrylic, as it will cause the plastic to instantly crack and shatter (a process called crazing).

Method 2: Using a Diode Laser (The "Paint Hack" Way)
A blue diode laser beam passes straight through clear acrylic like a window. To make it work, you can use this heat trick that has become really popular online to trap the laser's heat. Here’s what to do:
- Peel the top masking: Remove the protective film or paper from the top side of your clear acrylic sheet.
- Apply a dark coating: Coat the top surface with a solid, matte black layer. I use black tempera paint (carefully apply it with a foam brush or roller), but a black dry-erase marker can also work. Then, let it dry completely.
- Place scrap metal underneath: Put a piece of scrap metal or a honeycomb grid under the acrylic. Do not use wood or cardboard underneath, or the laser will burn them and stain your clear plastic with smoke.
- Engrave with higher power: The diode laser will hit the black paint, generate intense heat, and micro-melt the acrylic directly underneath it.
- Wash it off: Take the acrylic to a sink and wash the black paint off with warm water and soap. The frosted engraving will stay behind.
Explore more on how to clean acrylic after engraving
Top Settings and Tips for Engraving Acrylic
- Use no or little air assist: Turn your air assist completely off or very low during engraving. High air assist blows the melted white acrylic dust back onto the sheet, making the engraving look messy and gray. (Note: You must turn air assist back on high when it is time to cut the acrylic.
- The LED nightlight trick: If you are making a popular LED edge-lit nightlight, I find that it is better to set your software's line interval (scanning gap) to a tight setting like 0.08mm to 0.1mm. This creates a perfectly smooth, solid white frost that catches the LED light beautifully.

How Do You Engrave a Photo On Acrylic?
Photo engraving on acrylic is highly rewarding, but the process takes some time and requires strict image preparation. Image preparation is especially important because lasers cannot print shades of gray. So, you must convert your photo into a pattern of tiny dots (dithering) that tricks the eye into seeing an image.
A very important tip is to always engrave photos on the back side of clear cast acrylic using a mirrored image for a professional, glass-like finish.
Step 1: Prepare the Photo (The Software Step)
You cannot just throw a raw JPEG into your laser software and get a good result. First, you must use LightBurn or a free tool like GIMP or Photoshop to prepare the file. Follow these important steps:
- Crop and enhance contrast: Crop out messy backgrounds and boost the contrast significantly. You want bright highlights and deep shadows.
- Convert to grayscale: Strip all color from the photo.
- Invert the colors (Crucial): Because you are engraving clear acrylic that turns white when struck by the laser, you must invert the photo (make it look like a creepy film negative). This is important because the laser needs to burn the brightest parts of the photo (like teeth and eyes) so they turn frosted white, while leaving the dark parts untouched so they remain clear.
- Choose a dithering mode: In LightBurn, change your image mode to Stucki, Jarvis, or Atkinson. These algorithms break the photo into clean dot patterns that look fantastic on plastic.
- Mirror the image: Flip the entire design horizontally. This ensures it reads correctly when viewed from the front.
Step 2: Prepare the Material
Your choice of acrylic dictates whether you need to coat the surface.
- For CO₂ lasers: Leave the original paper masking on the front of the acrylic to protect it from stray smoke. Peel the paper off the back side where you will actually be engraving.
- For diode lasers: Remember that a diode laser cannot engrave clear acrylic without help. Peel the back masking and roll on a smooth, solid coat of black tempera paint or black chalk spray. Let it dry completely.
Step 3: Laser Settings and Execution
An important secret is: "less is more" when it comes to photo power. If your settings are too hot, the dots will bleed together and melt into a blurry white blob.
- Line interval (DPI): Set your line interval between 0.08mm and 0.1mm (roughly 254 to 318 DPI). Going any higher will concentrate too much heat and melt the details.
- Power and speed: Use low power and high speed. You only want to scratch the very surface of the plastic. (For example, on a 40W CO₂ laser, a common starting point is 15% power at 300 mm/s.
- Air assist: Turn your air assist completely OFF or down to a gentle whisper. High air assist blows sticky, vaporized acrylic back onto the photo, ruining the sharp dot details.
Step 4: Cleanup and Display
- Wash the piece: Clean off any remaining paint (if using a diode) or white acrylic dust using warm water and dish soap.
- The golden rule of cleaning: Never use rubbing alcohol (isopropyl alcohol or Windex) on laser-engraved acrylic. It will cause the plastic to instantly develop tiny fractures and shatter (crazing).
- Backing the photo: Because the image is transparent, it looks best when placed against a dark background (like a black piece of cardstock or a dark wood frame) or placed inside an LED edge-lit acrylic base to make the frosted dots glow.
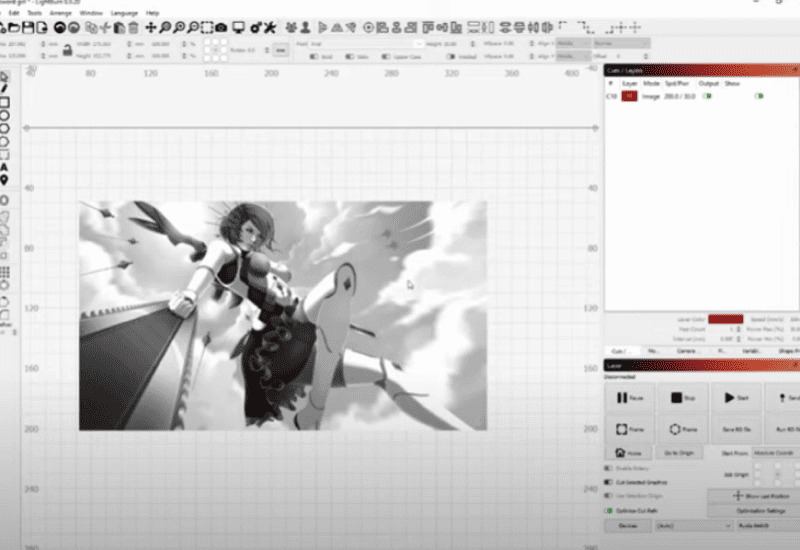 How I Engrave Beautiful Photos With My OMTech Pronto 60W CO2 Laser and LightBurn
When you are using a machine like OMTech’s Pronto 60W CO₂ laser, along with LightBurn, you do not need any paints or masking hacks. The Pronto is a high-speed machine (capable of rastering up to 1,000 mm/s), so my goal is usually to leverage that speed with low laser power so the dots fracture cleanly into a frosted white color without melting together.
Here is my exact step-by-step workflow, which consists of some baseline info from OMTech's software guides and my own personal experience in laser engraving
Step 1: LightBurn Image Settings
Import your photo into LightBurn (Ctrl + I). Right-click the image and select Adjust Image to open the preparation menu.
- Image mode: I change this to Jarvis or Stucki. These modes create the cleanest dither patterns (dot arrangements) for portraits.
- Invert image: Turn this ON. Since the laser turns clear acrylic white, the next step is to invert the photo into a negative.
- Line interval / DPI: Here, I set my interval to 0.08mm (which automatically sets the DPI to 318). If your DPI is too high, the dots will overlap and melt into a blurry blob.
- Enhance radius and amount: I increase the Enhance Radius to 25 and Enhance Amount to 100. This sharpens the edges of the dithered dots so they display crisp details on the plastic.
- Mirror the design: Select the photo in your main workspace and click the Flip Horizontal button on the top toolbar. You will be engraving the image onto the back side of the clear acrylic so it looks perfectly smooth from the front.
Step 2: Cut Layer Settings (Pronto 60W)
Double-click your image layer in the "Cuts and Layers" window to apply your 60W glass-tube laser parameters. Here are the settings I use:
| Setting | Recommended Value | Why I Use It |
| Speed | 450 mm/s to 500 mm/s | Takes advantage of the Pronto's high-speed linear rails. |
| Max Power | 11% to 14% | 60W is powerful; anything over 15% will overheat and melt acrylic details. |
| Min Power | 11% to 14% | Match your max power so the laser doesn't fade when slowing down. |
| Air Assist | OFF or Low | High air blows sticky, melted dust back into the tiny engraved details. |
Step 3: Machine Setup
- Elevate the sheet: At this point, I place my clear cast acrylic on the Pronto's honeycomb bed. The honeycomb pins or small scrap blocks, which I use to lift the sheet slightly off the metal. This stops "flashback" (the laser beam reflecting off the bottom grid and scarring the back of your plastic).
- Focus perfectly: I use Pronto's Autofocus feature to ensure your focal point is exactly on the top surface of the material. A blurry focus ruins photo engravings instantly.
- Keep top masking on: I usually leave the manufacturer's protective paper masking on the face-down side (the front of your final piece). Then, I peel the paper masking off the side facing up (the back side), which is the side to be lasered.
Step 4: Cleanup (The Golden Rule)
Once the Pronto finishes processing, I take the acrylic out. Then, the next step is to peel off any remaining front masking and wash the piece with warm water and mild dish soap to wipe away the white powder.
Critical Warning
Never clean your engraved acrylic with rubbing alcohol (isopropyl alcohol), glass cleaners like Windex, or acetone. Alcohol causes a chemical reaction called crazing, which will make your freshly engraved photo instantly develop hundreds of tiny fractures and shatter.
To make the photo truly pop, mount it inside an LED edge-lit base or place a piece of matte black cardstock directly behind the clear sheet!
Best Acrylic Laser Engraving Ideas
Because acrylic is cheap, durable, and handles light beautifully, people use it for everything from quick gifts to profitable side hustles. I have taken the most popular, highly rated acrylic laser engraving ideas and classified them into 4 main categories: light/ edge lit projects, business and event signage ideas, home decor/keepsakes ideas, and small items/merchandise ideas.
1. Lighting and Edge-Lit Ideas
Acrylic is essentially a fiber-optic cable; light travels straight through it until it hits an engraved scratch, causing that scratch to glow brightly.
- LED nightlights: This is the ultimate acrylic laser engraving idea. Creators engrave cartoon characters, family names, or geometric patterns on clear cast acrylic and slot them into cheap, mass-bought wooden or plastic RGB LED bases.
- Custom PC side panels: PC builders love buying large sheets of clear acrylic, engraving intricate anime or sci-fi patterns on them, and using them as custom cases lit up by internal RGB computer parts.
- Illuminated desk signs: Great for home offices or streamers, featuring "ON AIR," "STREAMING NOW," or custom gamer tags that light up at the flip of a switch.
2. Business and Event Signage Ideas
Because acrylic looks professional and sleek, people frequently make high-margin items for local businesses or weddings.
- QR code display signs: Restaurants and markets love these. You engrave a Venmo, Instagram, or menu QR code on the acrylic, paint-fill it for high contrast, and mount it on a wooden base. Explore how to laser engrave a QR Code.
- Wedding and event signage: Faux-glass welcome signs, table numbers, and place cards made of clear, frosted, or mirror acrylic are massive hits.
- Laser-etched business cards: Frosted or black acrylic cut and engraved to the exact size of a business card. It feels premium and leaves a huge impression.
3. Home Decor and Keepsakes Ideas
- Anatomical and map art: Many people engrave highly detailed city street maps or fantasy world maps (like Middle-earth) onto clear acrylic, then layer them over dark wood backdrops for a stunning 3D shadow box effect.
- Mirrored wall art: By flipping mirror acrylic upside down and engraving away the silver backing layer, you can create gorgeous decorative wall mirrors with intricate patterns or quotes that don't disrupt the smooth glass front.
- Recipe preservation plates: Engraving a late grandmother's handwritten recipe onto a clear acrylic cutting board or display plaque to preserve the handwriting forever.
4. Small Items and Merchandise
If you want to sell items at craft fairs or online, low-cost small items made from acrylic scraps are highly recommended by the community.
- Two-tone keychains: Using specialty material like Rowmark (a plastic sheet with a colored top layer and a different colored core). When you engrave through the top, a perfectly contrasting logo or name is revealed underneath without needing paint.
- Custom board game tokens: Upgrading cardboard pieces for games like Settlers of Catan or Dungeons and Dragons with colored, etched acrylic tokens.
- Earrings and jewelry: Intricate geometric shapes etched and cut out of pastel or holographic acrylic sheets, then attached to earring hooks.

Final Thoughts on Laser Engraving Acrylic
If there is one takeaway from this guide, it is this: use high-quality cast acrylic whenever possible and match your machine to the material. CO₂ laser engravers remain the gold standard because they engrave every acrylic color with exceptional clarity, while diode lasers can still achieve excellent results when used with the proper techniques.
With a little experimentation and careful setup, acrylic can become one of the most versatile and profitable materials in your laser engraving workshop.
You may also be interested in how to laser cut acrylic trophies, which is usually the natural next step after you master the intricacies of acrylic laser engraving.





